Phish Report Integration with 3rd Party Phish Report Buttons
Boxphish supports the use of 3rd party phish reporting solutions alongside its phishing simulations assuming that those buttons can send the reported emails as an.eml file to a SecOps mailbox. Once c…

Boxphish supports the use of 3rd party phish reporting solutions alongside its phishing simulations assuming that those buttons can send the reported emails as an .eml file to a SecOps mailbox. Once configured any email reported as phishing will be handled by the 3rd party provider and if the email is a phishing simulation from Boxphish the following will happen:
- The email will not reach the SecOps mailbox as it does not require internal investigation.
- The User will be sent a congratulations email based on a customisable template thanking them for being vigilant and reporting a phishing email.
- The phishing simulation reported will be marked as such within the Boxphish system and be presented in the reports for that user.
How does the Phish Report Integration work?
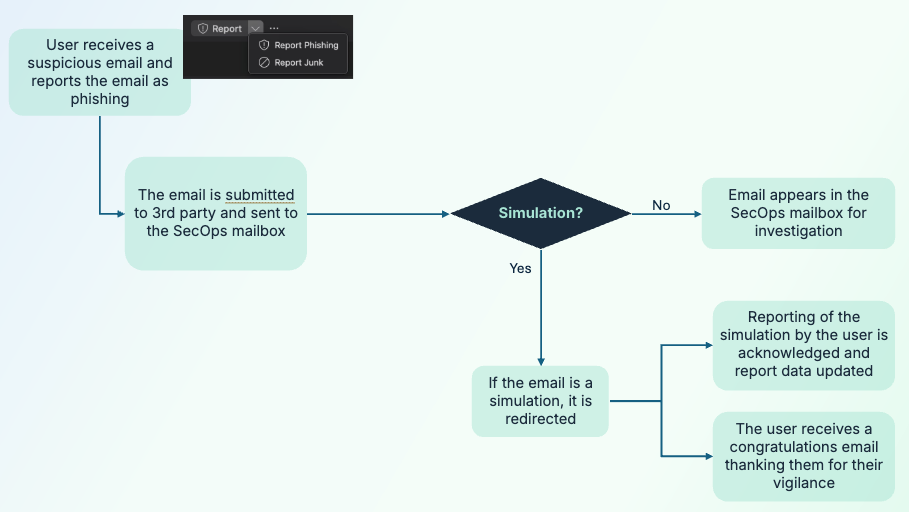
The Phish Report integration empowers users to report any email they are suspicious of to their IT team, and for the IT team to make full use of their selected 3rd party's email reporting capabilities. The Boxphish phishing simulations will be seamlessly removed from the SecOps investigation mailbox and processed by Boxphish separately.
The diagram below shows the logical flow of the integration.
Setting up the 3rd Party Button
Assuming a 3rd party button can support forwarding an email to a SecOps mailbox as a .eml file then Boxphish simulations can be reported successfully and reflected in the simulation data.
Please refer to the relevant 3rd party documentation to configure the button.
Email Redirection Rule
The following steps detail how to configure a mail flow rule in Microsoft Exchange, however similar steps can be applied to alternative email providers.
- Navigate to the Transport rules section of the Microsoft Exchange Admin Centre at the following location: https://admin.exchange.microsoft.com/#/transportrules
- Select 'Add a rule' and a pop-up will appear
- Give the rule a meaningful name, for example 'Boxphish Phish Report Forwarding'
- Set the 'Apply this rule if' logic as 'The recipient' and 'is this person' and then select the mailbox configured in Defender as the reporting mailbox.
- Add a second condition as 'The subject or body' and 'subject or body matches these text patterns' and then enter the text 'box.boxphishmail.com'.
- In the 'Do the following' section add select 'Redirect the message to' and 'these recipients' and then enter 'boxphish@phishreporting.com' as the recipient.
- Leave the 'Except if' section empty.
- On the 'Set the rule settings' page leave the settings as the default and click next.
- Review the rule and click finish. The rule will now be created, which may take a few seconds.
- Once saved, the rule will need to be enabled. Select the newly created rule and toggle the 'Enable or disable rule' toggle to 'Enabled'. You may also need to increase the priority of the rule by clicking the 'Edit rule settings' and setting an appropriate priority level based on your existing rules.
How did we do?
Collections
Phish Report Integration with Microsoft Defender